Key Takeaways:
- The Ourdream Image Generator stands out as a tool designed to make visual imagination effortless.
- With its character-based generation system, flexible customization options, and user-friendly design, Ourdream makes it possible to go from concept to creation in just a few clicks.
- Below we’ll explore how it works, what makes it unique, and why it’s becoming a go-to choice for anyone who wants to bring their dream visuals to life.
I tested Ourdream AI Image generator and here is the result:
I’m going to show 5 images, all generated from the same model and I won’t think hard about it, I just want to see how it would perform when asked to change the atmosphere, context and the level of the sexualization.
Image 1 – Yoga in the mountains
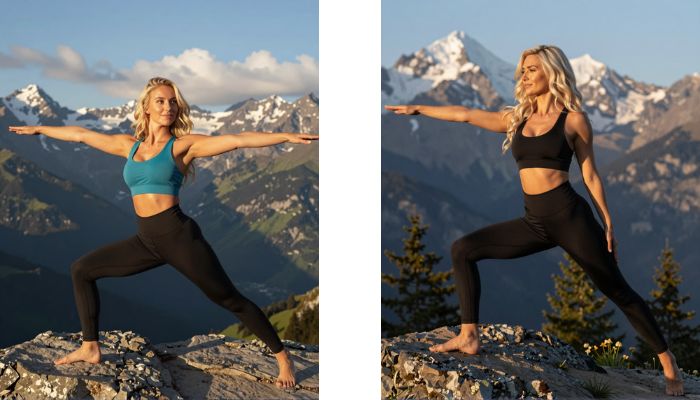
First, I want to see how the model handles a physically positive image, so I put “Sporty” and “realistic” to check how it performs. In this case, I’m particularly interested in proportions, anatomical correctness and lighting, as when this fails, you can tell. Here’s the result: The result looks pretty good and in character.
Image 2 – Mirror selfie
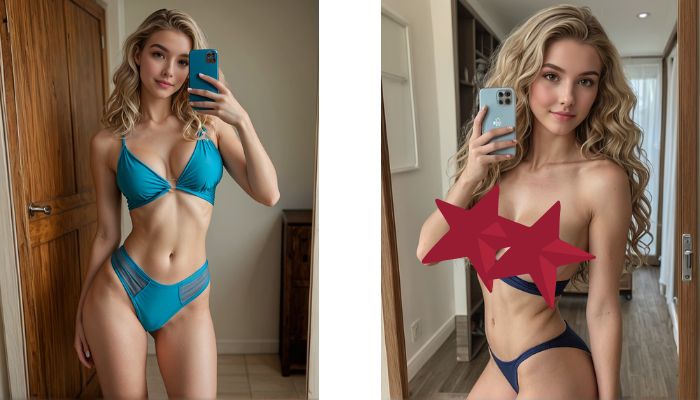
Here, I’m testing whether the model can create a mirror selfie that looks somewhat realistic, without shouting “AI”. The pose, the phone, facial expression, all of it matters for this prompt. Let’s see whether the character looks plausible in real life. Here’s the result: Not bad, not bad at all.
Image 3 – Studio / Neutral background
In this one, I’m checking the limits of the NSFW content generation. Not trying to push it to the extremes, just check how well the system handles some level of sexuality. I expect some level of restraint, but some level of sexyness too. Here’s the result: Looks pretty good to me.
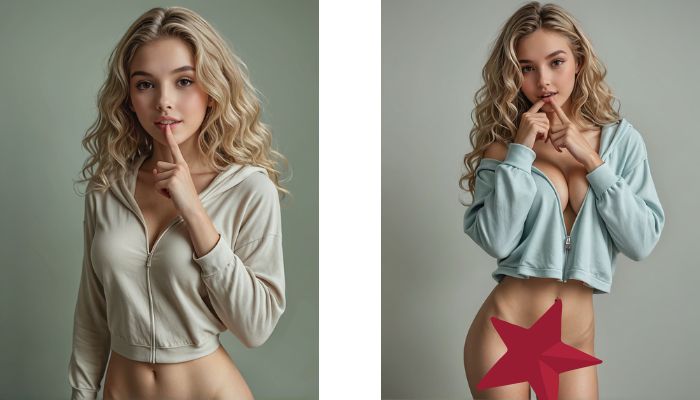
Image 4 – Relaxed indoor setting
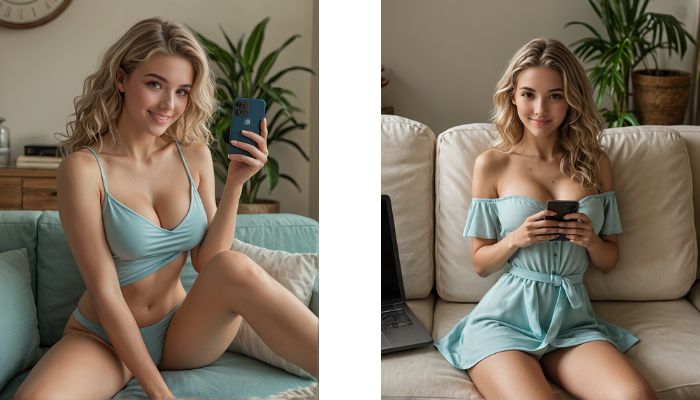
Now I want to see whether the model can convey a sense of confidence and sexyness, without going full NSFW. I’m looking for a pose, facial expression, the works. If it fails, the image will look awkward, if it succeeds, I expect the image to look pretty intentional. Here’s the result: Looking good.
Image 5 – Studio full-body pose
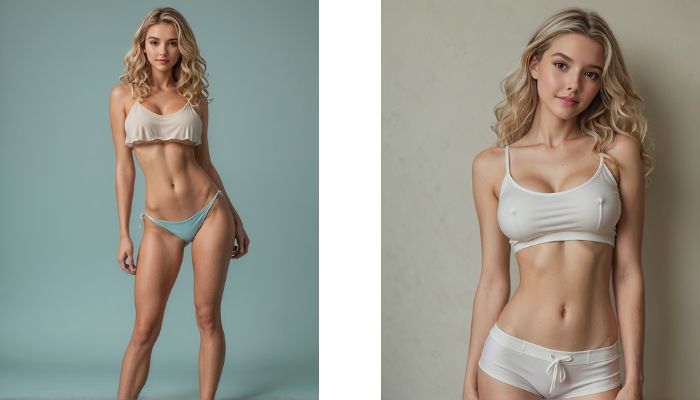
Finally, I want to check whether the model can dial it down a notch, and do something simple and casual. Here’s the result: Works for me.
Overall
All things considered, the image generation works best when guided by mood rather than descriptions. When the desired outcome is clear, the character looks the same in wildly different contexts, which, in my opinion, is the strongest factor for whether the images look like spam or not. It’s why I could continue generating without stopping at the first result.
Ourdream AI Image Generator Guide
Here’s a clear, step-by-step guide to creating images with this Ourdream AI Image generator. I’ll walk you through every control that appears in the UI.
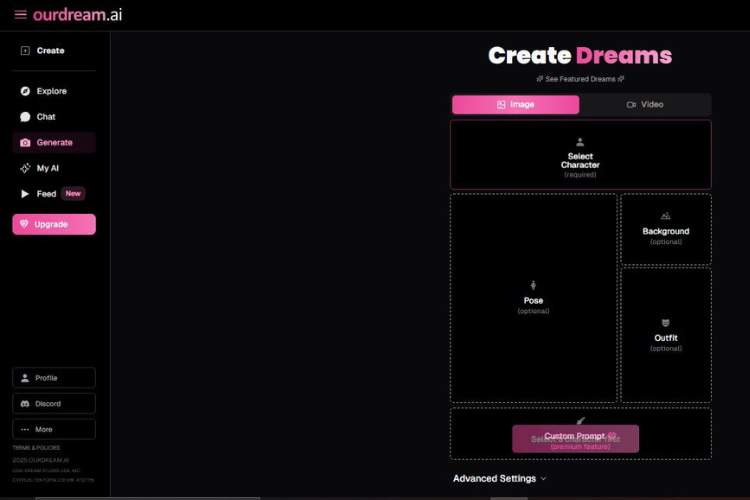
Step 1 — Choose the creation mode & Select Character (required)
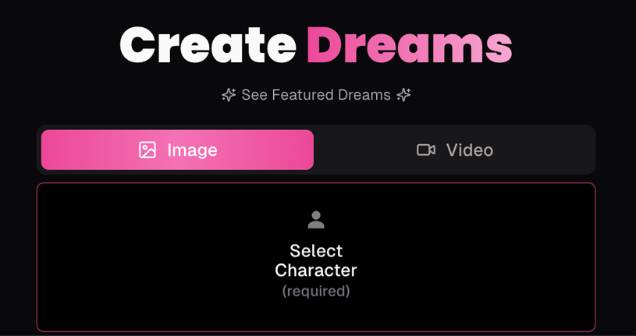
Screen elements you’ll see:
- A header that says Create Dreams.
- A toggle with two tabs: Image and Video.
- A large card labeled Select Character (required).
- A small link See Featured Dreams (handy for inspiration).
What to do:
- Make sure the Image tab is selected (it’s highlighted in pink when active).
- Use Video only if you intend to generate motion later; for still pictures keep Image on.
- Click the Select Character card to choose who/what your image is about.
- This is the only required input on this screen. You won’t be able to continue without picking a character.
Tips:
- If you’re unsure what style you want, click See Featured Dreams to view examples and get ideas before you pick.
Step 2 — Add visual guides: Pose, Background, Outfit (all optional)
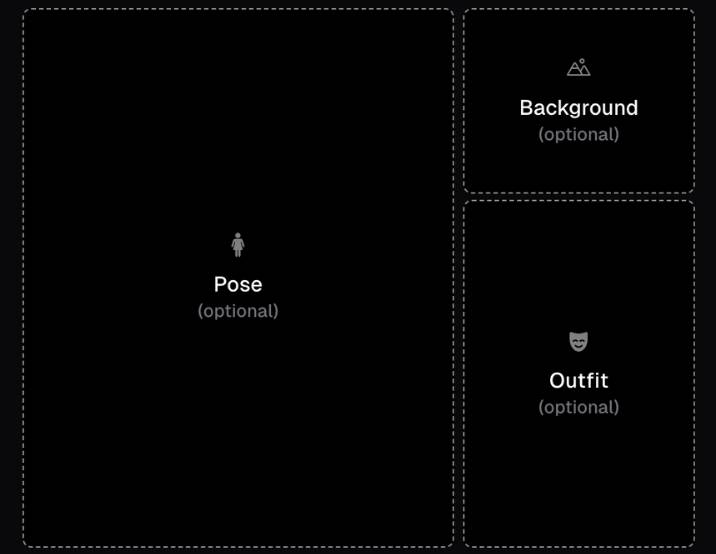
Screen layout:
- A large panel on the left: Pose (optional).
- Two stacked panels on the right: Background (optional) on top, Outfit (optional) below.
What each option does:
- Pose: Suggests the character’s body position or composition (e.g., standing, sitting, close-up, full body).
Use this to steer framing and posture without writing a long prompt. - Background: Hints at the scene or environment (e.g., studio backdrop, city street, beach at sunset).
Useful when you want consistent settings across multiple images. - Outfit: Guides clothing and accessories (e.g., formal suit, casual streetwear, fantasy armor).
How to use:
- Click any of the three panels to select or configure that element.
- These are optional—skip any you don’t need. The generator can infer missing pieces from your character and prompt later.
Tips:
- Start simple. Add Pose first if composition matters most; add Background/Outfit only if you need extra control.
- If you plan to use a Negative Prompt later (Step 3), you can keep these lighter and let the negative prompt rule out unwanted details.
Step 3 — (Optional) Write a Custom Prompt and Negative Prompt
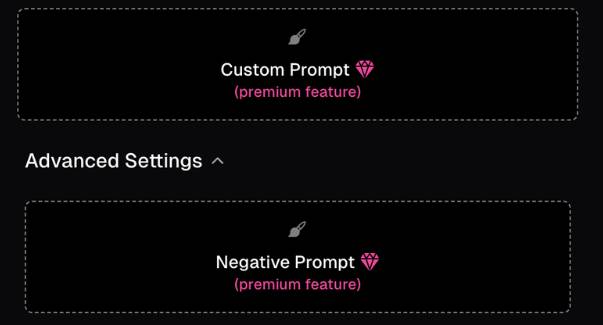
Screen elements you’ll see:
- Custom Prompt — marked (premium feature) with a diamond icon.
- Advanced Settings section that expands to reveal:
- Negative Prompt — also a (premium feature) with a diamond icon.
What they do:
- Custom Prompt (Premium): Your main text description to push style, mood, lighting, camera angle, etc.
Example: “Cinematic portrait, soft rim light, shallow depth of field, kodak-style film grain.” - Negative Prompt (Premium): A list of things you don’t want.
Example: “no blur, no extra fingers, no text, no watermark, no low-res.”
How to use:
- If you have access to premium: click into Custom Prompt and describe the look in short, clear phrases; then open Advanced Settings and add a Negative Prompt to block artifacts.
- If you’re not on premium: you can skip this step and rely on Character, Pose/Background/Outfit, and Step 4 settings.
Tips for strong prompts (when available):
- Write in concise, comma-separated attributes.
- Keep the Negative Prompt practical (use it to remove specific flaws or styles you dislike).
Step 4 — Choose Orientation & Number of Images
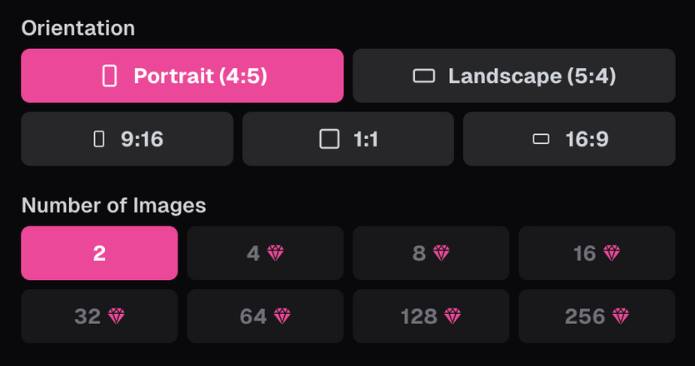
Screen elements you’ll see:
- Orientation options:
- Portrait (4:5) (selected by default)
- Landscape (5:4)
- 9:16
- 1:1
- 16:9
- Number of Images:
- 2 (free/default)
- Higher counts 4, 8, 16, 32, 64, 128, 256 (marked with a diamond — premium)
What to pick (use-case guide):
- Portrait (4:5): Great for people/character portraits and many social feeds.
- Landscape (5:4) or 16:9: Ideal for wide scenes, banners, or hero sections.
- 9:16: Best for Stories/Reels/Shorts and mobile-first vertical uses.
- 1:1: Classic square for profile images and grid posts.
Variations:
- 2 images (free) gives you quick A/B options.
- Premium higher counts are perfect when you want a larger batch to pick from or need more variety.
Generate (finalize your request)
After you’ve:
- Selected your Character,
- Optionally set Pose/Background/Outfit,
- (If premium) added Custom/Negative prompts, and
- Chosen Orientation and Number of Images,
use the on-screen Generate/creation button to start the render.
Pro tips for better results
- Decide what matters most. If composition is key, set Pose first. If vibe is key, focus on Background and (if available) Custom Prompt.
- Avoid conflicts. Don’t over-specify the same thing in multiple places (e.g., setting a beach Background but asking for “indoor studio” in the prompt).
- Use aspect ratios strategically. Pick the ratio that matches your final destination (social post, banner, story).
- Iterate. Start with 2 images, keep the best, then try a larger batch (premium) with minor tweaks.
That’s it—follow these four panels top to bottom, and you’ll have clean, consistent generations with just the controls shown on each screen.
Try Ourdream AIOurdream Image Generation Pricing
If you actually look at what you are getting, it isn’t that confusing. You get 2 images for 10 coins, 4 images for 20 coins, so sure, that’s 5 coins per image. Once you realize this, it’s really not that confusing anymore and I like that.
I’ve also messed with orientations and aspect ratios, and the good news is, that doesn’t change the pricing at all. Need a portrait image for a profile picture or the like? Still the same price. Want to try a super-wide cinematic aspect ratio just to see how it looks? Still the same price. I like this. It allows you to play around without having to worry about the math each time in your head.
Ourdream AI Image Generator Comparison
| Feature | Ourdream Image Generator | Candy AI Image Generator | Mydreamcompanion Image Generator |
|---|---|---|---|
| Cost per image | 5 coins | Credits vary | Credits vary |
| Batch generation | 2 or 4 images | Usually single | Mostly single |
| Aspect ratios | Portrait & landscape | Limited presets | Basic presets |
| Style control | High | Medium | Medium |
| In-chat generation | Yes | Yes | Yes |
What else can you do with Ourdream?
Sure, generating images is part of Ourdream, but to be honest, it’s not the way I usually play. Sometimes I generate images, sometimes I play with video, sometimes I go back to chat to see how she’ll respond if she’s lured off topic. It’s not entirely chat, by the way, as she also has short voice clips, so she’ll answer a question with an audio reply sometimes.
But basically, you can create your own AI girlfriend in a “choose what she looks like” sense, but also in a “what kind of personality will she have” sense. Do you want her to be mischievous? Quiet? Contemplative? You can try, and then adjust based on how it goes. Sometimes it’ll do what you expect, sometimes it won’t, and I think that’s kind of the fun of it. It’s a “shaping” kind of thing, not just “press button A, button B, etc.”
Now, here’s how it hits—in my own layered, imperfect way
This tool doesn’t say “Nope, can’t go there.” You whisper a prompt—“soft glow, silhouette, intimate vibe”—and it paints it, subtle or bold depending on how much detail you feed it. High-quality art, multiple styles, fast—once the milliseconds pass, your scene pops up.
Premium? It’s the difference between a quick sketch and a detailed painting. Custom prompts, advanced settings—those let you dial up realism, tweak the mood, light, everything.
Real Talk: Should you bother?
If you’re just testing waters, free tier might get you something – vague, maybe censored. But if you want control over risqué detail, the premium makes a real difference.
You gain access to full prompts, higher fidelity generation, finer edits—and yes, nudity and erotic content becomes easier to get where you want it.
- Free users: Can generate images—just limited. No explicit labeling, but brass-tacks detail may be muted.
- Premium users: Get full art creation with custom prompts, detailed specs, higher resolution, fewer barriers.
My personal vibe
It’s the kind of tool that doesn’t shame you—not always common when creativity meets NSFW. It feels safe, private, almost daring in a subtle way. You’re steering the scene, not the AI steering you.
But be aware—the output quality can vary. Some prompts nail it; others misfire, especially if you’re vague or inconsistent. Still, those glitches can feel like spit takes in conversation—imperfect, but oddly bonding.
Final thoughts—quick and messy, but human
- Yes, NSFW image generation is possible here—with enough detail in your prompt and comfort with a little tweaking.
- Free gets you started; premium gives you the keys to the gallery.
- If you’re hungry for nudity or adult themes—give it a shot, just tread smart.
- Want help crafting that first erotic prompt or navigating premium features? I’ve got ideas. Just say when.
You’re not just generating images—you’re writing scenes. And that’s what makes it feel alive.