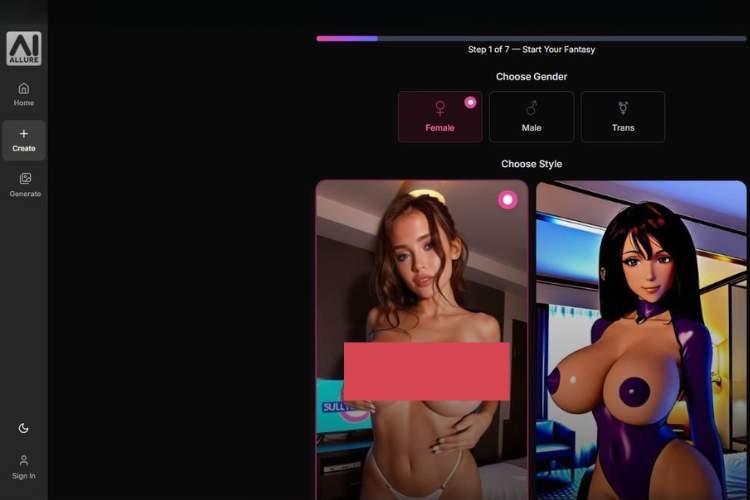
Ever stumble onto something that seems polished but still feels like it’s nudging you—like, “Go ahead, try me”? That’s kinda AIAllure for NSFW image generation. You land on their setup page and it’s already tempting: 15 daily free messages & image generations, flirty AI chat, and what they call “NSFW scenes – tastefully censored (for now)”.
Think of it like being handed the keys to a sports car—but you’re told to keep it under 50 km/h unless you upgrade. It’s enough to get you revved up: you name your AI character, maybe pick “Girlfriend,” “MILF,” “OnlyFans,” “Pornstar,” or even “Anime Babysitter” in the dropdown. They’ve set the stage for something adventurous.
Then you have the choice: stick around with the free slice of cake, or go full-on Pro. From other listings, Pro gets you unlimited messages & images, NSFW content, AI video generation, and all the juice you really want.
⚡️ TRENDING IMAGE GENERATORS ⚡️
Candy AI

NSFW AI Images
Personality Customization
Lifelike Girlfriend Experience
Mydreamcompanion
Hyper-Realistic AI Design
Find Your Dream Companion
NSFW AI Roleplay
Ourdream
Uncensored Image & Video Generation
Create Your Dream Girl
Group Chat Available
AIAllure Image Generator — 3-Step User Guide
I tested AIAllure Image generator. That’s why I decided to create this comprehensive step-by-step guide to facilitate those who want to try it.
Step 1 — Choose what you want to create
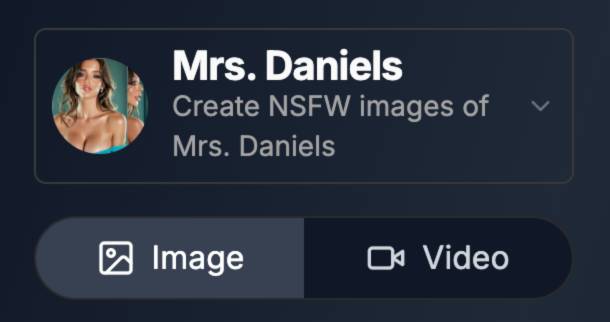
Where: The card at the top (e.g., “Mrs. Daniels …”) and the Image | Video toggle.
- Select the subject/preset
- Click the dropdown on the subject card (with avatar and title).
- Pick a character/preset or keep the default. Presets pre-load a “look” and may bias facial features, styling, and outfits.
- Choose the output type
- Image (selected by default): generates still images.
- Video: switches the app into video mode (not covered here).
Tip: If you plan to make general portraits or product shots, Image is the right mode.
Step 2 — Describe the image
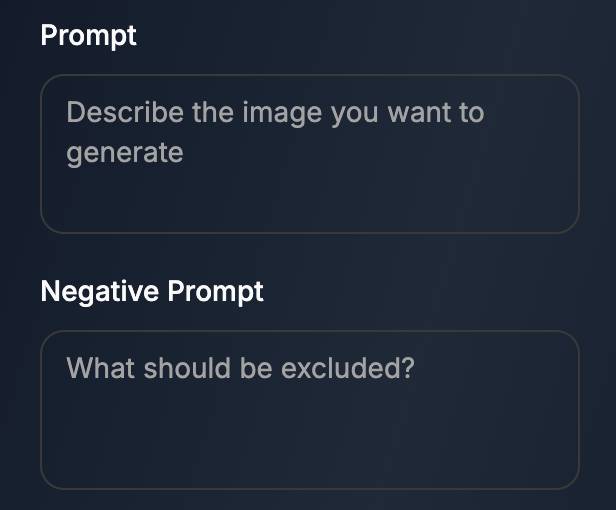
Where: “Prompt” and “Negative Prompt” boxes.
- Prompt (what you want)
- Write a clear description of subject, scene, style, lighting, and camera/composition.
- Examples (safe/general):
- “Cinematic portrait of a woman in a teal satin dress, warm sunset light, soft depth of field, 85mm lens, studio backdrop.”
- “Minimal product shot of a matte-black smartwatch on a marble slab, overhead lighting, crisp shadows, editorial style.”
- Negative Prompt (what to avoid)
- List defects or elements you don’t want:
“blurry, low quality, extra fingers, distorted hands, watermark, text, logo, frame, artifacts, oversaturation.” - Use this to keep results clean and focused.
- List defects or elements you don’t want:
Prompting tips
- Be specific but not verbose. 1–3 sentences are usually enough.
- If a detail keeps appearing, move it to Negative Prompt.
- Keep real-person identities out of prompts to avoid policy or likeness issues.
Step 3 — Pick mode & generate
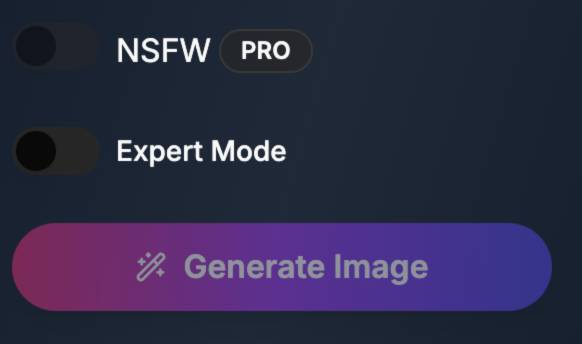
Where: Left-side toggles + big Generate Image button.
- NSFW (PRO)
- Toggle only if your plan allows and if your content is intended for mature audiences.
- Leave off for standard or SFW results.
- Expert Mode
- Off by default. Turn on to reveal advanced controls (below).
- Generate Image
- The button activates once you enter a Prompt.
- Click it to create your image. If you want variations, tweak your prompt/controls and click again.
Expert Mode — Advanced controls (when toggled ON)
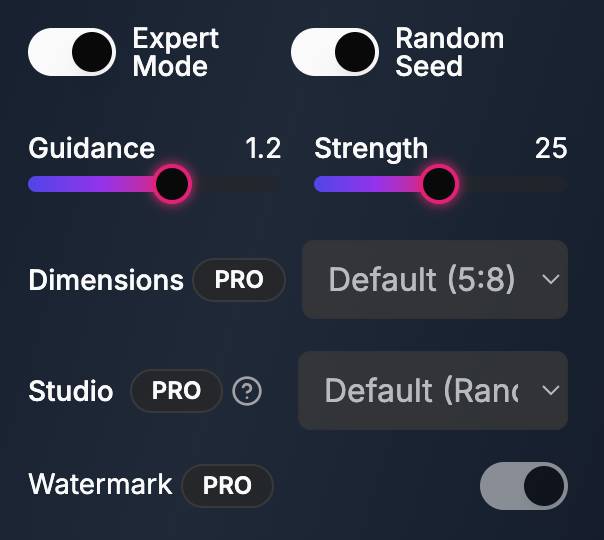
You’ll see the following extra options (as in your “Expert Mode availabilities” screen):
- Random Seed (toggle)
- On: locks the random seed so the generator is reproducible (same prompt + same settings → very similar output).
- Off: each run starts from a new seed for more variety.
- Guidance (slider, shown ~1.2)
- Controls how strictly the model follows your prompt (often called CFG).
- Lower (~0.8–1.2): more natural, freer interpretation.
- Higher (≥1.5): more literal to the prompt but can look stiff or over-cooked if pushed too far.
- Strength (slider, shown ~25)
- Governs the amount of randomness/creativity in the diffusion steps.
- Lower: subtler, cleaner results with fewer wild changes.
- Higher: bolder, more dramatic shifts; can introduce artifacts if extreme.
- Dimensions (PRO, dropdown)
- Sets aspect ratio. Default is 5:8 (portrait).
- Choose 1:1 (square), 9:16 (vertical), 16:9 (landscape), etc., depending on where you’ll publish.
- Studio (PRO, dropdown)
- Selects a model/style studio (Default: Random).
- Useful for consistent aesthetics (e.g., photo-real, editorial, illustration).
- Watermark (PRO, toggle)
- Adds or removes a visible watermark.
- If you require branding or attribution, keep it on.
Quick recipes (safe examples)
- Clean portrait (Instagram-ready)
- Prompt: “Bright studio portrait, soft key light, gentle rim light, neutral gray backdrop, 85mm, natural skin tones.”
- Negative: “blurry, harsh shadows, watermark, text, logo, oversaturation.”
- Expert: Guidance 1.1, Strength 20, Dimensions 4:5 (portrait), Random Seed off.
- Product on white
- Prompt: “High-key e-commerce shot of ceramic mug, seamless white background, subtle shadow, crisp edges.”
- Negative: “text, watermark, reflections, fingerprints, blurry.”
- Expert: Guidance 1.2, Strength 15, Dimensions 1:1, Random Seed on (for consistent re-renders).
Troubleshooting & best practices
- Generate button is greyed out: Enter text in Prompt first.
- Results look off-topic: Increase Guidance slightly (e.g., +0.2) and clarify the prompt.
- Artifacts or warped hands/faces: Add problems to Negative Prompt and lower Strength a bit.
- Every result looks the same: Turn Random Seed off, or meaningfully change one prompt element at a time.
- Wrong framing/crop: Switch Dimensions to a ratio that matches your target (e.g., 9:16 for vertical posts).
🏆 Best Image Generator: Candy AI
What you get—free vs Pro:
Free tier:
- 15 images per day (decent chunk if you’re casually testing it out)
- Some flirt, some spice—but “tastefully censored” means there’s a filter that keeps it somewhat PG-ish
Pro tier (around $12–15/month):
- No limits on how many images or messages you can generate
- Full NSFW access—styles like “Glamour,” “Hardcore,” “POV,” or amateur and pornstar-inspired modes
- AI video generation may come with it, too—so you could go beyond static images
Let me get a bit real: the free tier’s enough to see the art style, test the vibe, play around with a few scenarios. It might leave you thinking, “Okay, I’m curious… what else can this do?” That’s the moment where going Pro starts to feel tempting.
From what I’ve seen, if you’re after the deeper, uncensored versions—the stuff that really gets your creative fantasies lit—you’ll want the Pro tools. And yeah, that means paying a few bucks a month, but the expansion in freedom? For some folks, that’s totally worth it.
On a personal note, that little “tastefully censored (for now)” line felt like a tease. Makes me think: the free layer is like the appetizer—tasty, but you know the main course is behind that paywall. And once you get a taste? You want more flavor.
So if you’re on the fence, give the free tier a spin. Create a character, run a few prompts, see how the images turn out. If you catch yourself wanting more detail, more freedom, more edge—that’s your signal.
AIAllure Image Generator Alternatives
Users may shift focus to different AI image generator offerings once included credits expire, premium tools stay inaccessible, or fees rise notably. Some also prefer creative breadth or weaker filtering in scenarios where artistic styles encounter blocks.
When reviewing pricing, utility, or permissive policy, evaluating distinct methods of image generation is appropriate. The alternatives listed here are cited for improved oversight, expanded free use, or limited restrictions.
Making the Most of AI Image Creation Tools
If you want to stretch the potential of AI image creation tools, choosing ones that don’t force an account at the start can make the process easier. AI image generators with no sign in allow quick trials, which means more time spent refining prompts and visual tweaks rather than dealing with registrations or payments.
Just be aware that some generators apply blur filters or limit high-quality downloads until you pass a certain number of generations.
Final verdict (my own two cents)
AIAllure’s got that hook. Free version is friendly, easy to warm up with. Pro opens up the floodgates—no limits, no filters, full fantasy mode. If that intrigues you, it’s worth the leap.